
Vintage Fan Ripple Stitch
Welcome to our lovely blog Handmade Learning Here. Today we are going to discover a beautiful pattern, with a unique and stunning design.
In the realm of crochet, certain stitches evoke a sense of nostalgia and timeless elegance. One such stitch is the vintage fan ripple stitch. Characterized by its undulating waves and intricate fan-like motifs, this stitch has captivated crafters for generations. In this article, we’ll delve into the allure of the vintage fan ripple stitch, its history, and how you can incorporate it into your crochet projects today.
The History of Vintage Fan Ripple Stitch
The origins of this stitch can be traced back decades, with its roots firmly planted in traditional crochet techniques. While the exact date of its inception is uncertain, vintage patterns featuring similar ripple motifs can be found in crochet publications dating back to the early 20th century. Over the years, the stitch has evolved and adapted, but its timeless appeal remains unchanged.

What sets the vintage fan ripple stitch apart is its delicate yet structured appearance. The stitch is comprised of alternating clusters of double crochets and chain stitches, creating a ripple effect reminiscent of gentle waves. At the peak of each ripple are fan-like motifs, formed by clusters of double crochets worked into the same stitch or chain space. This intricate combination of stitches results in a texture that is both visually captivating and delightfully tactile
Vintage Fan Ripple Stitch Crochet Pattern
The Vintage Fan Ripple Stitch is a beautiful and timeless crochet pattern inspired by classic designs from the Victorian era. Its elegant fan-like texture and gentle ripple effect make it a wonderful choice for a variety of crochet projects.
Whether you are making a cozy blanket, a decorative cushion cover, a delicate shawl, or a stylish scarf, this versatile stitch can add a sophisticated and vintage-inspired touch to your project.
Applications and Versatility
One of the most appealing features of the Vintage Fan Ripple Stitch is its versatility. The repeating pattern can be used for many different crochet projects, from cozy afghans and blankets to delicate shawls, scarves, and cushion covers.
The stitch can also be customized by using different yarn weights, hook sizes, and color combinations. You can work with two contrasting colors for a more noticeable design or experiment with multiple shades to create your own unique look.
Its rhythmic stitch pattern makes it enjoyable to crochet, while the finished texture gives your project an elegant and decorative appearance. Whether you are an experienced crocheter or just beginning to explore textured crochet stitches, this pattern is a lovely project to try.
About the Vintage Fan Ripple Stitch
The Vintage Fan Ripple Stitch is a classic-looking pattern with a sophisticated appearance. Its design combines basic crochet stitches to create a beautiful repeating texture and gentle wave effect.
In this guide, you will learn how to create the stitch using fundamental crochet techniques. The instructions are written in US crochet terminology, making them easy to follow as you work through each row.
The pattern can be adapted for different types of projects and adjusted to create different widths and lengths. With the right yarn and color combination, you can create anything from a traditional vintage-inspired blanket to a modern decorative accessory.
Project Details
This crochet pattern is written using US crochet terms and is suitable for crocheters of different skill levels.
The pattern can be adapted to different yarn weights and project sizes. The suggested finished size is approximately 18 inches wide by 12 inches long, making it suitable for a decorative cushion cover.
For this project, you will need two contrasting yarn colors and an H/8 (5.0 mm) crochet hook.
Keep in mind that the final size may vary depending on your yarn weight, hook size, and individual crochet tension.
Materials
Crochet hook size H/8 (5.0 mm)
Yarn in two contrasting colors
Yarn needle
Stitch marker
Scissors
Crochet hook size H/8 (5.0 mm)
Yarn in two contrasting colors
Yarn needle
Stitch marker
Scissors
Abbreviations (US Terms)
ch – Chain
sc – Single crochet
hdc – Half double crochet
dc – Double crochet
tr – Treble crochet
st – Stitch
sc2tog – Single crochet two stitches together
dc2tog – Double crochet two stitches together
ch – Chain
sc – Single crochet
hdc – Half double crochet
dc – Double crochet
tr – Treble crochet
st – Stitch
sc2tog – Single crochet two stitches together
dc2tog – Double crochet two stitches together
Vintage Fan Ripple Stitch Instructions
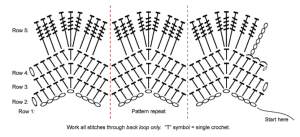
Foundation Chain
To begin, make a foundation chain of 87 stitches for a smaller size or 103 stitches for a larger size.
Try to keep your foundation chain loose and even. This will make it easier to work the first row and help prevent the bottom edge of your project from becoming too tight.
Row 1
Make a single crochet in the second chain from the hook.
Continue working one single crochet into each remaining chain across the row.
Turn your work.
You should have:
86 stitches for the smaller size
102 stitches for the larger size
Row 2
Chain 3. This counts as a double crochet.
Make a double crochet in the first stitch.
Then repeat the following sequence across the row:
Skip the next 2 stitches, then make a single crochet in the following stitch.
Continue repeating this sequence until you reach the final 2 stitches.
Skip the last 2 stitches, then make a double crochet in the final stitch.
Rows 3–5
Repeat Row 2 for Rows 3, 4, and 5.
As you work these rows, the repeating stitches begin to create the distinctive fan and ripple texture of the pattern.
Try to maintain an even tension throughout the rows so that the finished fabric remains consistent.
Row 6
Chain 3. This counts as a double crochet.
Make a double crochet in the first stitch.
Then repeat the following sequence:
Skip the next 2 stitches, then work a single crochet decrease (sc2tog) over the next 2 stitches.
Continue repeating this sequence across the row.
When you reach the final 2 stitches, skip them and make a double crochet in the last stitch.
Rows 7–9
Repeat Row 6 for Rows 7, 8, and 9.
Continue working the decreases as instructed to develop the ripple shape and textured appearance of the pattern.
Row 10
Chain 3. This counts as a double crochet.
Then work a double crochet decrease (dc2tog) over the next two stitches.
Continue repeating the double crochet decrease across the row until only one stitch remains.
Make a double crochet in the final stitch.
Fasten off your yarn and weave in all loose ends using a yarn needle.
VIDEO TUTORIAL
We know that there are people who prefer learning in video form, so we have put together a tutorial video made by Janis Cortese’s YouTube channel. It’s a very educational video and you can watch it below:
Happy crocheting! 🧶💕